Are you are planning out buying land and building your own permaculture homestead from scratch, but are worried of the logistics and the size of the project you face? You want to take it on in manageable chunks. If one of your first issues is how to work on the property when you have limited time, then you may want an inexpensive, flexible shed to use as your weekend workshop.
This idea is based on an off the shelf shed from Home Depot and a couple of trips using a van/minivan or pickup truck worth of materials. There are phased updates to it that are meant to create an efficient, comfortable work area during those weekend visits. The shed can also be relocated to a more permanent spot once development is complete.
SITE SELECTION
The first step of course is to find a suitable spot on your site that is fairly level and has good access. You will need a clear area around it and it should be close to where you plan to build your home.
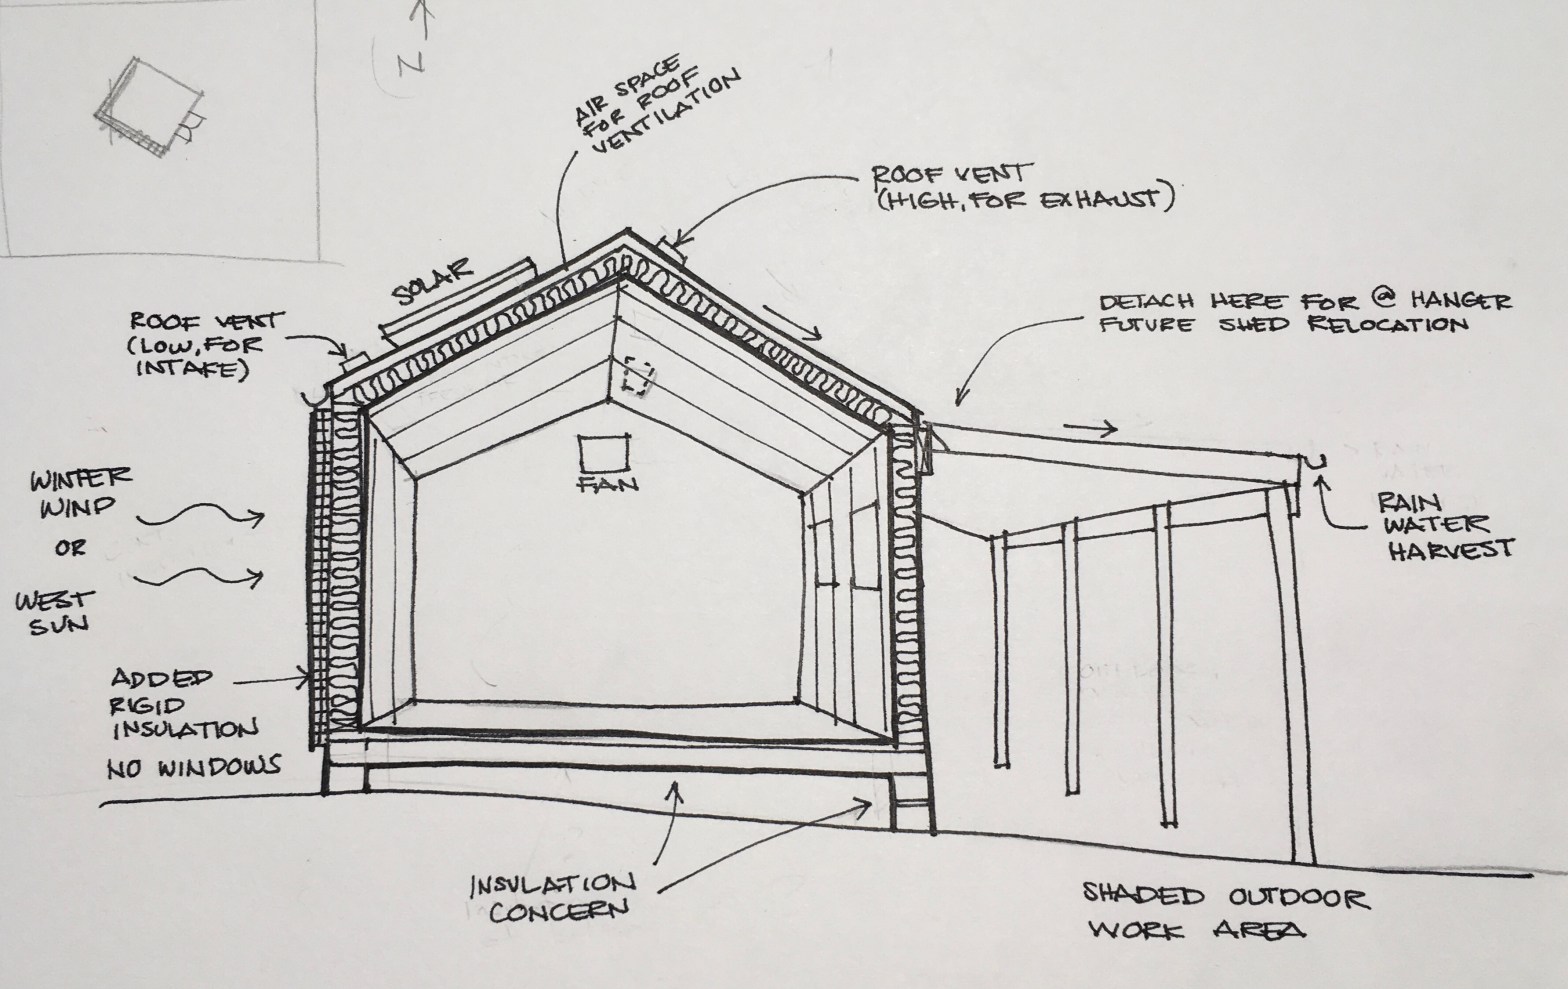
Thinking back on your permaculture skills, we observe and interact to orient the shed so that one side faces the western sun and/or the windward side. More useful if you can put the shed in the shade of existing trees and face it to where your winter wind comes from.
The selection of this spot does not mean you have a design for the whole property, it just means you have a good thought out location for where the most of your construction will be. Avoid analysis paralysis, this shed can be relocated later on. We’ll sit them on leveling blocks and plan to move them later. Keep in mind you want to have access to wherever you might end up moving this for it’s final location.
FUNCTION AND COMFORT
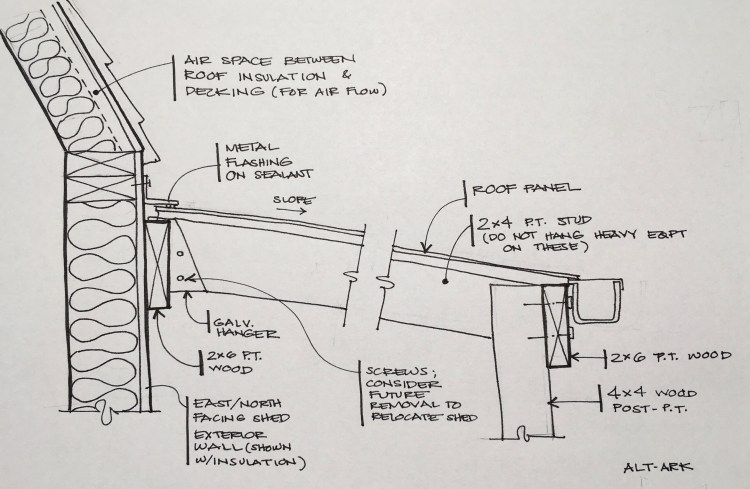
Since we have oriented the shed to the west, we can build an outdoor shaded work area on the east side. Using a 2×6 screwed to the exterior of the wall, this will act as a beam for your rafters. For your posts, you can use regular fence posts spaced maybe 4 or 6 ft apart on a concrete deck block. Your roofing materials will be made out of 3 ft polycarbonate/metal roof panels. Rafters will be 2x4s. Try to locate this area on ground that is lower than your shed, or raise your shed on cinder blocks-so that you can build up head room.
This lean-to outdoor work area should be light and inexpensive, efficient in the use of materials but will multiply usable space immensely. I imagine this will cost about $200 in materials.
A quick and easy add to the functionality of this shed would be a basic layer of insulation. batt insulation on the walls, 3.5″ thick since your shed has a 2×4 stud wall. I would look at 3″ insulation on the roof, leaving air space between the underside of the roof and the top of the insulation. The insulation will be left exposed since there’s not a lot of use to finish up the walls and adds unnecessary weight. Optional to add a plywood finish to mount tools on at select areas.
With this recent freeze we had in Texas, I’d explore adding an outer layer of continuous rigid insulation on the winter wind side of the shed-also works on the west facing wall. This would need an exterior finish if utilized which may just add to the work, and makes me think this can be punted as a later add.
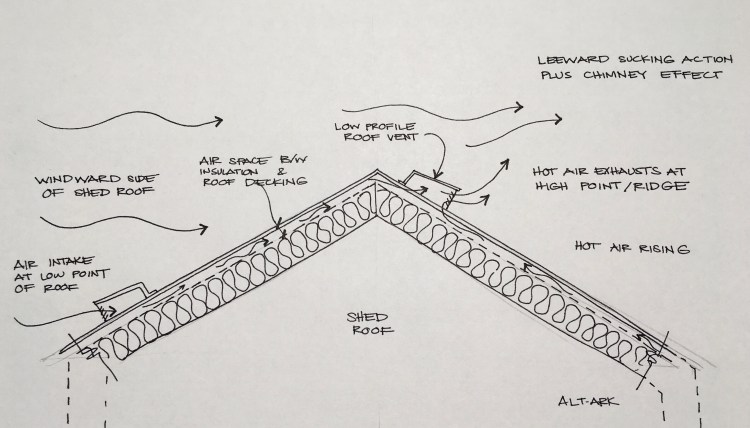
Adding roof vents would be the next step. Air intake on the low side of the roof, on the windward side. Exhaust close to the ridge line on the leeward side. I’d prefer the low profile roof vents since we want this to be light and inconspicuous.
From here I would think the shed would be pretty comfy, temperature wise.
Recycled windows would be a quick and easy upgrade too. Pretty easy to find on Facebook Market. To keep install easy, I would select it to fit your stud spacing. Not altering your studs will help keep rigidity for when you decide to relocate the shed later. Face the window towards the shaded work area.
WATER AND ELECTRICITY
For water, we have surface area to gather rainwater. You will need to add a gutter and plumb these to storage. We don’t have a toilet since we have no plumbing yet. That would be a future addition to this project, and since you have no infrastructure yet, probably be a composting toilet.
For energy, we can look at adding solar panels for some basic use. For one, you can add a solar powered fan to help exhaust hot air up on your ceiling. Again-try to keep this on the leeward side of the wind. A solar panel and battery bank can also charge up your tools while you are away, but we may need to cover that in a future post.
Now let’s step back and assess: what does all this provide? Well now you have a base of operations to work from. When you arrive to work on the homestead on a weekend, your tools are there, the way you sorted them. You won’t have to worry about loading up the morning of your trip, risking to forget something, wasting precious minutes loading and unloading. You’ll have space to store some of your materials as well. When you need a break, you have a place for that. This makes you so much more efficient and productive on a long term project. Also, once you are ready, you can move this to a more final location where it will continue to be useful and help you in your other projects.
Alt-Ark‘s goal is to make architecture more permaculture. We seek to empower the creation of homesteads that families can design to match the lives they choose.
